The Cursive REPL
The REPL is an integral part of any Clojure development environment, and Cursive is no exception. There are various types of REPL available in Clojure, and Cursive supports most of them.
Local REPLs
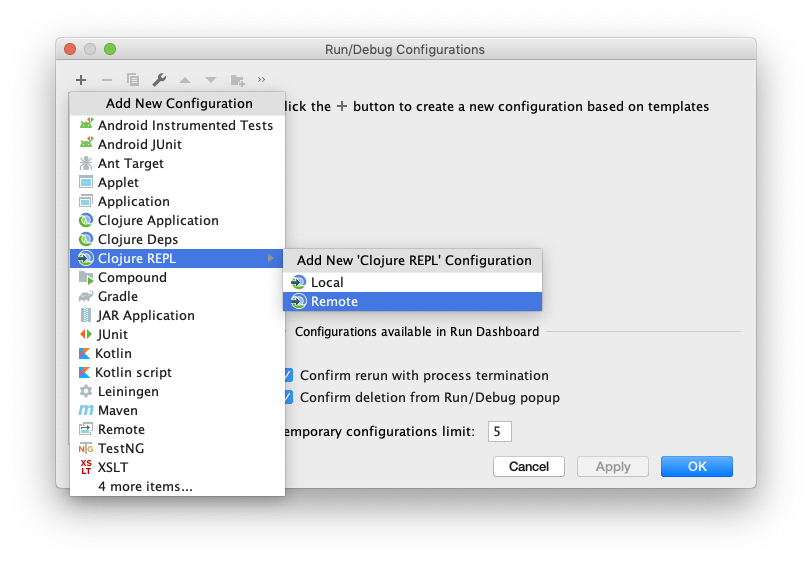
REPLs are started using Run Configurations. To create a new configuration, open , and
create a new configuration with +. Choose a local Clojure REPL as shown.
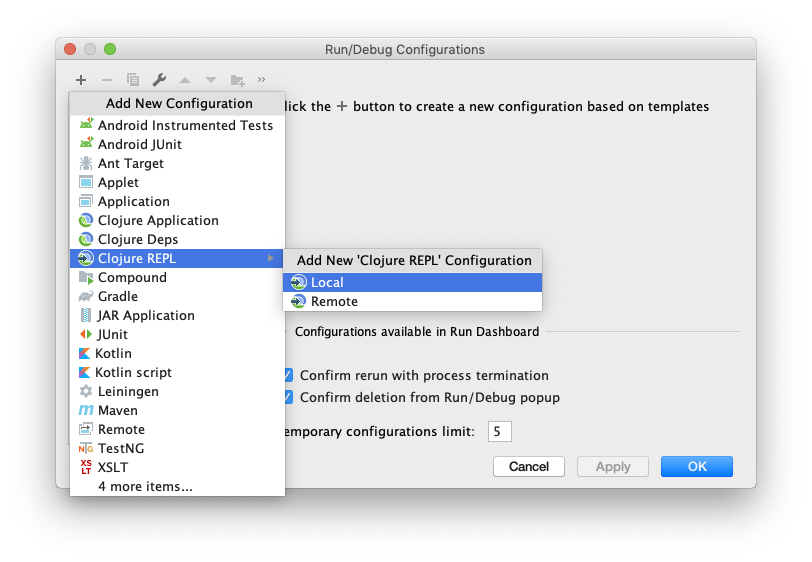
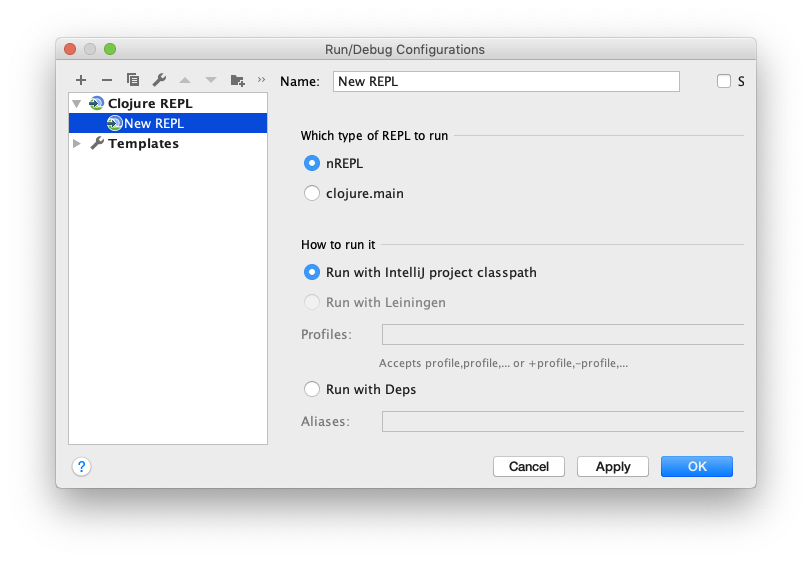
You can then name your new configuration and choose which type of REPL to run - see Repl Types below for a description of the different types of REPL available.
You can also choose how to run your REPL configuration. Usually, if your project is managed using Leiningen or Deps, you'll want to choose the corresponding option. That will allow you to set profiles or aliases, as well as ensuring that the build tool itself is used to run the REPL. This ensures that things like Leiningen plugins work correctly.
If your project is manually managing dependencies, or using some other build tool such as Maven or Gradle, you should select "Run with IntelliJ project classpath". As the name implies, this will simply use the classpath that IntelliJ has configured rather than fetching it from a build tool.
You can then also select which module to execute from, as well as specifying JVM args, environment variables, the working directory, and any additional parameters. You can also specify if you need the command line to be shortened - a full description of what this option means can be found in the IntelliJ documentation.
To run REPLs using Leiningen, Cursive internally uses the same mechanism as lein trampoline. If for some reason your
REPL doesn't work correctly using trampoline, see Remote REPLs below for a workaround.
If you want to modify the default settings for new instances of a particular run configuration type, you can do so under the Templates section in the left hand list. New configurations created of that type will use those settings.
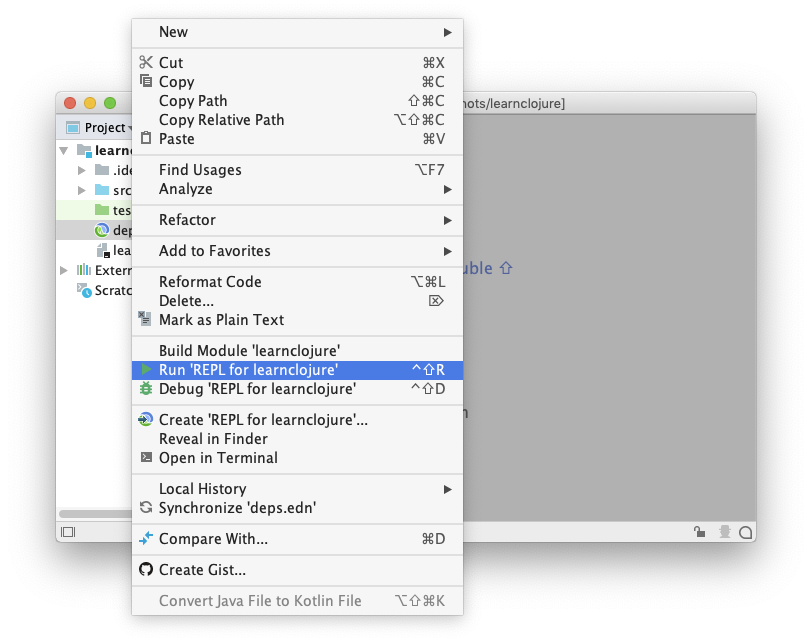
There is also a shortcut method for creating a run configuration - if you right click on the project window anywhere except inside a source root, you will get an option to create or run a run configuration directly. Running it will cause a run configuration to be created which you can later customise if required.
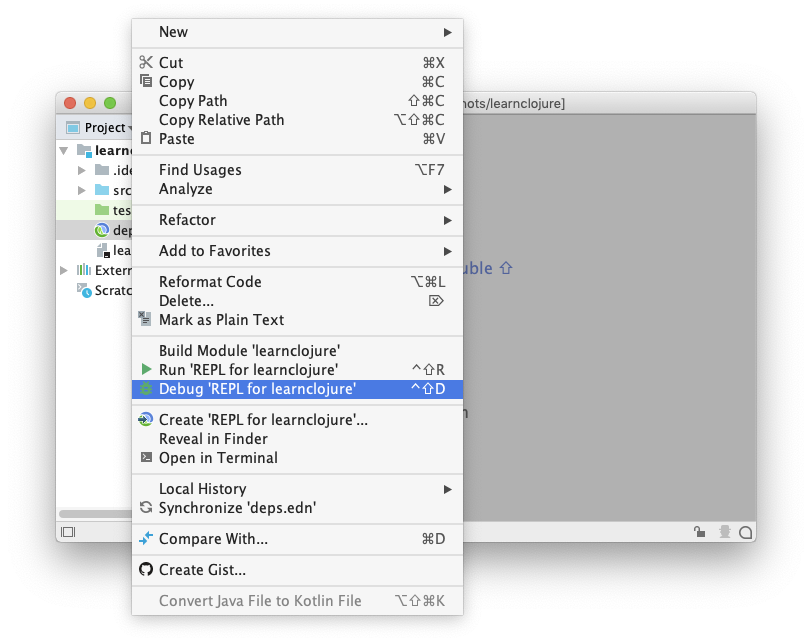
Starting a debug REPL
One very useful feature is the ability to debug a REPL session. This is very simple - simply run your local configuration in debug mode and a debugger will be automatically connected to it.
One thing that makes debugging with Clojure very difficult is locals clearing. This means that the Clojure compiler
will insert code to set any memory reference that it can prove will never be used again to nil. This is a problem when
debugging; you will see many of your local variables set to null when the code you are looking at could never have
caused them to take that value. This is done to prevent memory leaks from lazy sequences, which are cached in memory
to ensure that the same sequence will always return the same values in the same order. It's very confusing for
newcomers, and very frustrating when debugging for pretty much everyone.
Cursive starts all debug REPLs with locals clearing disabled, and all REPLs provide a toolwindow button
( ) which will toggle it in the REPL server. Note that this is a feature of the
compiler, so it only affects code when it is compiled - it's not a run-time flag. This means that if you toggle it
you must recompile any code you'd like to debug. This generally means reloading it in the REPL after turning the flag
on. Also, be very careful disabling locals clearing in any long-running process (e.g. a production server process)
since it may cause memory leaks.
) which will toggle it in the REPL server. Note that this is a feature of the
compiler, so it only affects code when it is compiled - it's not a run-time flag. This means that if you toggle it
you must recompile any code you'd like to debug. This generally means reloading it in the REPL after turning the flag
on. Also, be very careful disabling locals clearing in any long-running process (e.g. a production server process)
since it may cause memory leaks.
REPL startup timeout
Cursive also supports configuring the REPL startup timeout. This is the time that Cursive will wait for the REPL to start before assuming something has gone wrong. By default it's set to 60 seconds. You can change this value at Settings→Languages & Frameworks→Clojure→REPL startup timeout.
Remote REPLs
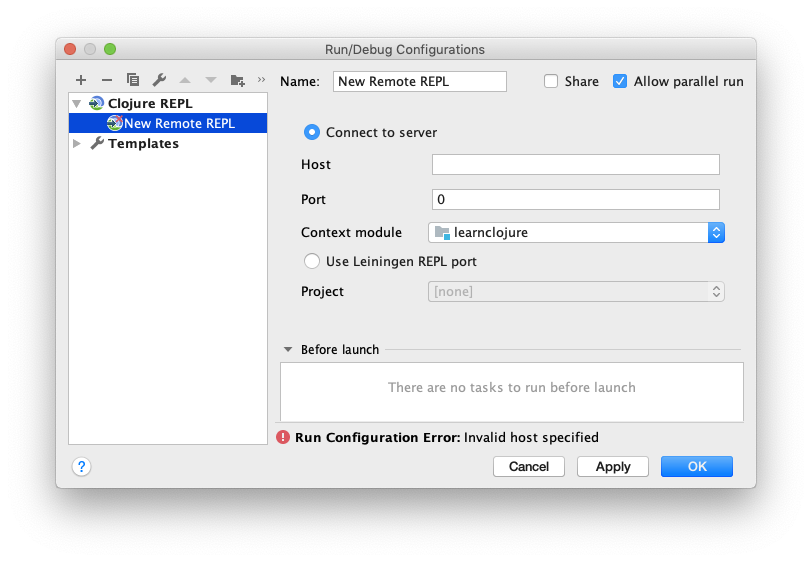
Alternatively, if you already have an nREPL server running somewhere, you can connect to it using a Remote configuration.
There are two options here - either you can configure it to connect to a host and port, or you can
configure it to connect to 127.0.0.1 and get the port from the port file written by Leiningen or other similar build
tool using nREPL. You can use this option if you want to start a REPL with Leiningen from the command line for some
reason (for example, your REPL doesn't work with the trampoline option used by Cursive).
You can start as many REPLs as you like of whatever type, and they'll appear in tabs in the REPL tool window.
Using the REPL
Now that you have your REPL running, you can type code into the editor window below, the results appear above. The current namespace is shown in the tab title at the top of the tool window. You can execute code by pressing Enter if the cursor is at the end of a valid form, or you can execute at any time by pressing . The editor is fully multi-line, and supports all functionality available in the main Clojure editor. You can move through your command history by using the up/down arrow keys, or jump between multi line items using Ctrl and arrow keys (Cmd arrows on Mac). If you don't want the editor to move between history items using the normal arrow keys, you can disable this with Settings→Languages & Frameworks→Clojure→Up/Down arrow keys move between history items.
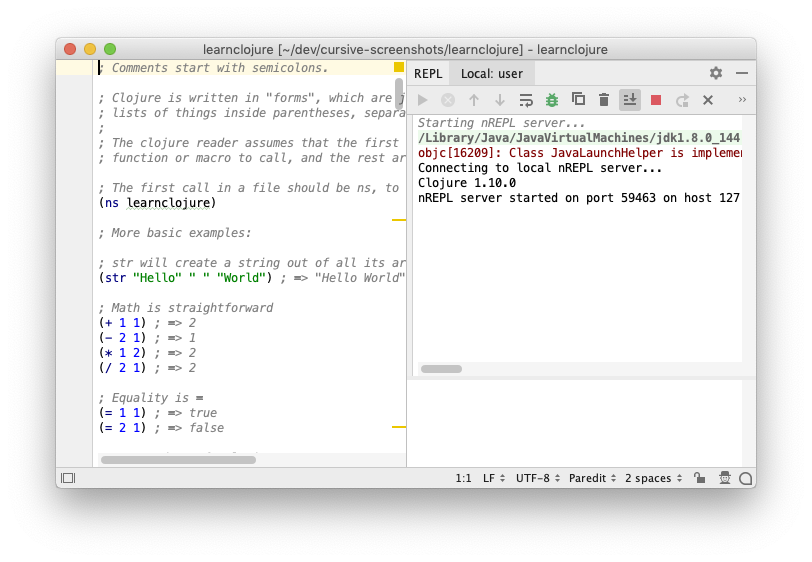
Using the buttons above the output window, you can interrupt the current execution, toggle soft wrapping of the output, clear the output, stop the REPL and reconnect (for remote REPLs).
Interaction with the editor
Often you'll be editing code in the main project windows, and you'll want to send code from your project to the running REPL. The commands to do this are under . "Load file in REPL" will send the contents of the current editor window to the REPL and execute its contents. A message will be printed out so you can see what happened.
"Load file in REPL" will calculate all the namespace dependencies of the file you're loading, and will
also load those dependencies in the correct order if any of them are out of date. This is very useful when editing
multi-namespace projects as it's often easy to forget when you've updated a file containing a function used by the main
code you're working on. It's also very useful when working on code that's require'd by its tests.
"Sync files in REPL" will load all out-of-date files from the editor to the REPL in the correct order, using the same transitive dependency calculation as "Load file in REPL".
This loading of dependent namespaces can have unexpected side effects, especially if one of the dependent namespaces creates data that would be overwritten by reloading it. If this bothers you, you can turn off this dependency functionality with Settings→Languages & Frameworks→Clojure→Load out-of-date file dependencies transitively.
You can also switch the REPL namespace to that of the current file using "Switch REPL NS to current file", and execute individual forms from the editor using the "Run form before cursor" and "Run top form" commands. If you have code selected in the editor, both of the Run form commands will send the selection instead.

REPL commands
Often, when interacting with the REPL, you will need to repeatedly execute the same commands. This is very common when using the reloaded pattern, but is also useful in other scenarios. Cursive allows you to assign keybindings to arbitrary commands and configure how they are executed.
When you have the REPL running, you can add a new command using :
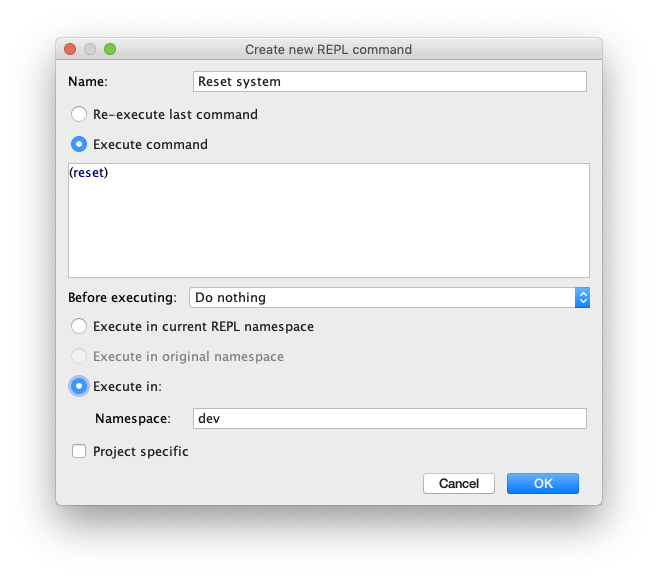
You must provide a name for the command, which will be used to name the IntelliJ action. The commands have two main types - either they will repeat the last command executed at the REPL, or you can enter a specific command to be run. You can choose whether to have the current file loaded before the command is run, or whether to have all out of date files synchronised as described above. You can also choose whether the command should be run in the current REPL namespace, or in a specific namespace you choose. Finally, you can choose whether the command should be specific to the open project, or global for all projects.
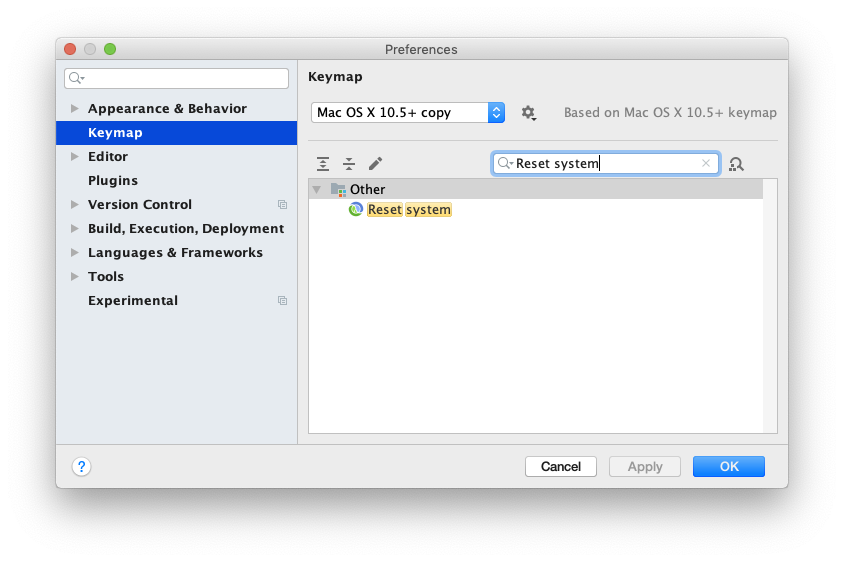
Once you have created the command, you can bind a key to the action in Settings→Keymap. You can find the command either searching for its name, or you can collapse the whole tree and then navigate to Main Menu→Tools→REPL→Commands.
The commands will also appear in the main menu under and can be invoked from there. If required, you can also later edit the commands using .
REPL Types
It's not essential to understand the following section to use REPLs in Cursive, but it's useful to understand what's going on under the hood when making decisions about which type of REPL to use.
There are two main styles of REPL used in Clojure. The most fundamental type of REPL is implied by the name:
it's a Read Eval Print Loop. So the server listens on some channel, Reads forms from that channel, Evals
them, Prints the result and then Loops around again. We'll refer to this type of REPL as a streaming REPL, since
all the communication between the client and the server happens over two streams: input and output. Cursive provides
this type of REPL via its clojure.main option.
The other style is what we'll call an RPC (Remote Procedure Call) style REPL. In this style, the client prepares
a data structure describing what to evaluate. It will typically contain the form to be evaluated, the namespace in
which to evaluate it and so on. The server then evaluates the form and sends back a data structure describing the
result. This will contain fields such as the result form, the current namespace after the evaluation, any output
generated over either stdout or stderr, and information about any exceptions which have occurred. nREPL uses
this style of communication, and is the main type of REPL used in Cursive.
Each REPL type has advantages and disadvantages. In general, streaming REPLs use a simple model which is easy to understand. Their main advantage is that because their entire protocol is simply two streams, it's possible to 'layer' REPLs, i.e. from within a Clojure REPL you can start a ClojureScript REPL and it will just work, or you can run code which implements something like a SQL interface to a database. Since everything just obeys a simple UNIX-like model, this nesting can work very well. However there are important caveats to this - if the REPL has been customised in any way (i.e. a custom printing function, or a custom prompt) then these features may interfere with each other in subsequent layers, and can't be composed. Christophe Grand wrote about these problems here.
The main limitation of streaming REPLs is that the output is all interleaved over a single stream, so tools like Cursive can't post-process it. When using nREPL with Cursive, by default all output is pretty-printed and syntax highlighted which makes it much more readable. That can't be done with a streaming REPL, since everything comes over the output stream - printed forms, printed output from the evaluations, any exception stacktraces, the prompt for the next evaluation etc. There's really no way to distinguish which part of the output is which, so the client has no choice but to simply print it all out and hope it makes sense to the user. It's also difficult to hide communication from the user in order to implement functionality like completion, since there's only a single stream. RPC style systems like nREPL make tooling development much easier because of this. Recent incarnations of streaming REPLs (e.g. Unrepl and pREPL) solve this by providing a sort of half-way solution where the input is streaming but the responses sent back to the client structured, which solves a lot of these problems.
Currently Cursive supports nREPL, and streaming REPLs only via clojure.main, i.e. a stdin/stdout streaming REPL.
If you require functionality similar to Clojure's socket REPL (which Cursive doesn't support yet), you can use
Tubular. Quite a lot of Cursive's functionality relies on nREPL, and won't be
available in clojure.main REPLs.
← Other Project Types General Editing →